Default WooCommerce product gallery raises the Cumulative Layout Shift problem. Although we can solve it by adding maximum height to the gallery element area, replacing it with a non-jQuery slider is better in many situations, like flickity slider.
Let’s say you have another fancy element below the critical area that requires jQuery. When we can actually defer it until we need it to show up, we have to load so many assets because your main slider, which is placed on the critical area, also depends on jQuery.
What is the Performance Benefit from Using Flickity Slider as an Image Gallery Slider?
- Reduce total blocking time.
By using flickity, we can defer javascript files which are needed later. - Lazy load images.
If you have like 10 images in your slider, you can tell the browser to show only the first one and load the other when user slide it. This way, we can save resource and reduce the blocking time caused by loading images. - Improve time to interactive.
By loading the flickity javascript files for your slider separately without waiting the whole javascript files on the page, the slider will be more responsive to human interaction. The image slider will be ready to be used even before the whole page finished loading. It’s good for user experience.
Steps to Replace WooCommerce Default Image Galler to Flickity Image Slider.
In the first step, we have to remove the WooCommerce default image gallery using this snippet:
remove_action( 'woocommerce_before_single_product_summary', 'woocommerce_show_product_images', 20 ); //Remove Single Product Image'
Now, in the second step, we create a function to remove the featured image displayed by GeneratePress. You can check the theme documentation or maybe contact the theme developer if you are using other themes.
add_action( 'wp', 'generate_remove_single_featured_image' );
function generate_remove_single_featured_image()
{
    if ( is_product() ) :
        remove_action('generate_before_content','generate_featured_page_header_inside_single', 10);
    endif;
}
In the third step, we enqueue the javascript and CSS files. I downloaded flickity.js and flickity.css and upload them to a subfolder in my WordPress subdirectory.
add_action( 'wp_enqueue_scripts', 'diko_enqueue_scripts' );
function diko_enqueue_scripts() : void {
    // Enqueue my styles.
    wp_enqueue_style( 'flickity-style', 'https://tweaked.gp.indowebstudio.com/diko/fl.css' );

    // Enqueue my scripts.
    wp_enqueue_script( 'flickity-script', 'https://tweaked.gp.indowebstudio.com/diko/fl.js', array(), null, true );
}
After that, the fourth step will be creating the structure for our flickity based slider.
function flickity_structure(){
	global $product;
	$attachment_ids = $product->get_gallery_attachment_ids();
	$featured_image = wp_get_attachment_image( get_post_thumbnail_id( $post->ID ), 'medium',"", array( "class" => "skip-lazy attachment-medium size-medium","loading" => "") );
	$featured_image_thumb = wp_get_attachment_image_src( get_post_thumbnail_id( $post->ID ), 'medium',"", array( "class" => "skip-lazy attachment-medium size-medium", "loading" => "") );
	echo '<div class="slider-container">';
	echo '<div class="main-carousel" style="width:100%">';
	echo '<div class="carousel-cell">' . $featured_image . '</div>';
	foreach( $attachment_ids as $attachment_id ){
  		//Get URL of Gallery Images - default wordpress image sizes
		echo '<div class="carousel-cell">' . str_replace('src', 'data-flickity-lazyload-src', wp_get_attachment_image($attachment_id, 'medium')) . '</div>';
	}
echo '</div>';
echo '<div class="carousel-nav">';
echo '<div class="carousel-cell" style="width:22%; display:inline-block"><img class="" src="' . $featured_image_thumb[0] . '" /></div>';
foreach( $attachment_ids as $attachment_id ){
  //Get URL of Gallery Images - default wordpress image sizes
	echo '<div class="carousel-cell" style="width:22%; display:inline-block"><img class="" src="' . wp_get_attachment_image_src( $attachment_id, 'medium' )[0] . '" /></div>';
}
echo '</div>';
echo '</div>';
}
The structure has been built, now it’s the time to call it. We hook it into the place where we remove the WooCommerce default image gallery.
add_action('woocommerce_before_single_product_summary','flickity_structure',25);
The next step will be to give our slider an inlined CSS style. We put it inlined because the flickity slider is positioned in the critical, above the fold area. Anything placed in the “above the fold area”, should have its CSS style inlined, period.
add_action('wp_head','flickity_inline_css',11);
function flickity_inline_css(){
	?>
<style data-noptimize="1">
.main-carousel{
    white-space:nowrap;
    position:relative;
    overflow:hidden;
	height:calc(100vw - 60px);
	margin-bottom:30px;
}
.main-carousel .carousel-cell {
    display:inline-block;
    width:100%;
    vertical-align:top;
}
.main-carousel .carousel-cell img{
    width:100%;
    object-fit: contain;
    height:calc(100vw - 60px);
}

	@media (min-width:469px){
		.main-carousel{
			height:300px;
		}
		.main-carousel .carousel-cell img{
    		height:300px;
		}
	}
	@media (min-width:769px){
		.slider-container{
			width:48%;
			float:left;
			position:relative;
		}
	}
.carousel-nav{
    height:75px;
}
.carousel-nav .carousel-cell{
	height:75px;
}

.carousel-nav .carousel-cell img{
    height:75px;
    width:100%;
    object-fit:contain;
    object-position:center center;
}
</style>
	<?php
}
The last step will be to initiate the slider using javascript which we put at the bottom of the page.
//Initiate Flickity JS on footer
add_action('wp_footer','flickity_inline_js',20000);
function flickity_inline_js(){
	?>
<script data-noptimize="1">
	var elem = document.querySelector('.main-carousel');
	var flkty = new Flickity( elem, {
  		// options
  		cellAlign: 'center',
  		contain: true,
		lazyLoad: true,
		adaptiveHeight: true,
		pageDots: false,
		prevNextButtons: false,
	});
	var elem_nav = document.querySelector('.carousel-nav');
	var flkty_nav = new Flickity( elem_nav, {
  		// options
  		cellAlign: 'center',
  		contain: true,
		lazyLoad: false,
		pageDots: false,
		asNavFor: '.main-carousel',
		prevNextButtons: false,
	});
</script>
	<?php
}
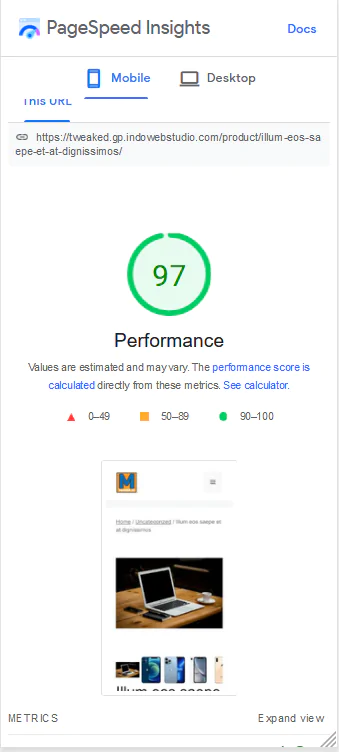
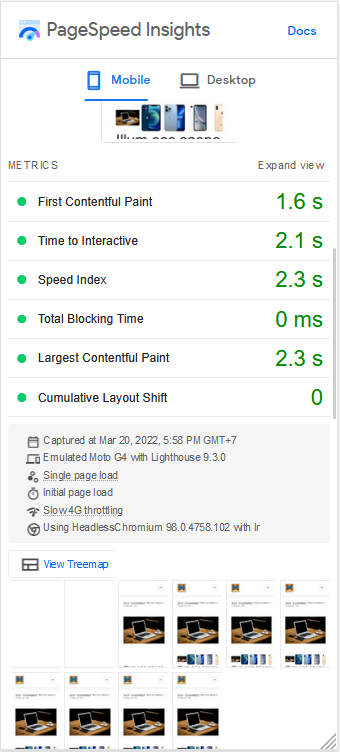
Any time any day, you can check it using the page speed insights tool, it passes all the Core Web Vital metrics and always score above 95. You can also check it using this link https://pagespeed.web.dev/report?url=https%3A%2F%2Ftweaked.gp.indowebstudio.com%2Fproduct%2Fillum-eos-saepe-et-at-dignissimos%2F
That’s it for today, if you have any questions, feel free to use the Disqus comment form below. This post is an alternative way to improve page speed performance on the WooCommerce product page. Previously, I had made a tutorial, a simpler one by just adding a height to the gallery, you can read it at this link How to Fix CLS Issue on WooCommerce Product Page.